Purpose

Manage FreeCAD model sharing and linear versioning. This app shows the framework capabilities. Very few line of code describe the user interface and manage persistent data. We can view this application as a small PLM (Product Lifecycle Management) for FreeCAD.

Roles

  • ROLE_ADMIN

  • ROLE_PLM_USER

See configure roles in Crew to add the role into your Intranet

Server Installation

Install everything in a new user (optional)

It is better to isolate Freecad in a specific user, in order to not override your Freecad configuration for your user.

To do so:

  1. create a new user:

    sudo useradd plm --create-home
  2. Add current plm group to current user

    sudo usermod -a -G plm <current user>
  3. Eventually change right of plm to allow group rxw

  4. Restart logout / login cycle or restart to apply group change to your user

Prepare FreeCAD to be used by the server

On a Linux server, it is better to install the following packages from your distribution:

  • Weston Wayland server

  • FreeCAD >1.0

Freecad must use Qt6 for Weston and Wayland. The PLM module will launch FreeCAD in a Weston desktop using the Framebuffer, so nothing is chown.

Check FreeCAD is linked against Qt6 on Linux / Mac
ldd /bin/freecad | grep Qt
    libQt6Widgets.so.6 => /usr/lib/libQt6Widgets.so.6 (0x00007f5b0dc00000)
    libQt6Gui.so.6 => /usr/lib/libQt6Gui.so.6 (0x00007f5b0d200000)
    libQt6Core.so.6 => /usr/lib/libQt6Core.so.6 (0x00007f5b0ca00000)
    libQt6PrintSupport.so.6 => /usr/lib/libQt6PrintSupport.so.6 (0x00007f5b12595000)
    libQt6SvgWidgets.so.6 => /usr/lib/libQt6SvgWidgets.so.6 (0x00007f5b12589000)
    libQt6Network.so.6 => /usr/lib/libQt6Network.so.6 (0x00007f5b0b609000)
    libQt6UiTools.so.6 => /usr/lib/libQt6UiTools.so.6 (0x00007f5b0f96c000)
    libQt6Xml.so.6 => /usr/lib/libQt6Xml.so.6 (0x00007f5b0efd8000)
    libQt6Svg.so.6 => /usr/lib/libQt6Svg.so.6 (0x00007f5b0eb57000)
    libQt6OpenGLWidgets.so.6 => /usr/lib/libQt6OpenGLWidgets.so.6 (0x00007f5b0efca000)
    libQt6OpenGL.so.6 => /usr/lib/libQt6OpenGL.so.6 (0x00007f5b0d157000)
    libQt6DBus.so.6 => /usr/lib/libQt6DBus.so.6 (0x00007f5b0c933000)

Configure the PLM Server

If you want just an overview, you can download the demo server, with default configuration, go directly in Launch Server Binaries.

Here are the step by step commands:

Clone the Intranet repository
git clone https://github.com/Taack/intranet.git
OR
git clone git@github.com:Taack/intranet.git
Go to app folder
cd intranet/app
Clone the PLM repository
git clone https://github.com/Taack/plm.git
OR
git clone git@github.com:Taack/plm.git
Edit the server/grails-app/conf/application.yml adding the following variables:
# PLM
plm.freecadPath: ${HOME}/freecad-app-link
Copy freecad launch script
cd
cp plm/freecad-app-link-distrib.sh freecad-app-link

From here, you can build the server or run it. Change current directory to the intranet folder and either:

Build the server binaries (for production environment)
./gradlew bootJar
Launch the server (for development environment)
./gradlew bootRun

Launch Server Binaries

Demo version is available here: Taack PLM releases, download server-0.6.jar

If you choose to build the server binaries, go to :

Launch the server
java -jar server/build/libs/server-0.6.jar

Server Arguments

See server/grails-app/conf/application.yml for a list of available options

Options to the server can be passed this way:

Combining Options
java -DOption1=Value1 -DOption2=Value2 ... -jar server-0.3.jar
Options
  • Path the Intranet store its files: -Dintranet.root=/home/test/someDir

  • Server port: -Dserver.port=9444

  • Database url: -DdataSource.url='jdbc:h2./prodDb2;LOCK_TIMEOUT=10000;DB_CLOSE_ON_EXIT=FALSE'

  • Freecad path: -Dplm.freecadPath=/somePath…​

  • Dot exe path: -Dexe.dot.path=/somePath…​

Current Configuration in server/grails-app/conf/application.yml
plm:
  freecadPath: ${HOME}/freecad-app-link

Install from Source

Clone the plm repository:

Clone PLM repository
git clone https://github.com/Taack/plm.git

Then copy the content of the plm folder into your intranet app folder (see intranet installation)

Set the FreeCAD path in the server/conf/application.yml file.

In the plm folder, you have 2 scripts you can use : freecad-app-link-distrib.sh if you use your distribution version of FreeCAD or freecad-app-link-flatpak.sh if you choose to install FreeCAD using Flatpak

Create a symlink in your home folder pointing to one of those scripts ln -s <path-to-plm-folder>/freecad-app-link-distrib.sh freecad-app-link.

Start your intranet issuing under the intranet folder:

Run Server from Source
./gradlew server:bootRun

You can produce a Jar file:

Build Server Binary from Source
./gradlew server:assemble

The server will be located under server/build/libs

FreeCAD Workbench Installation

Go into Tools > Addon Manager then refresh local cache and search for Taack.
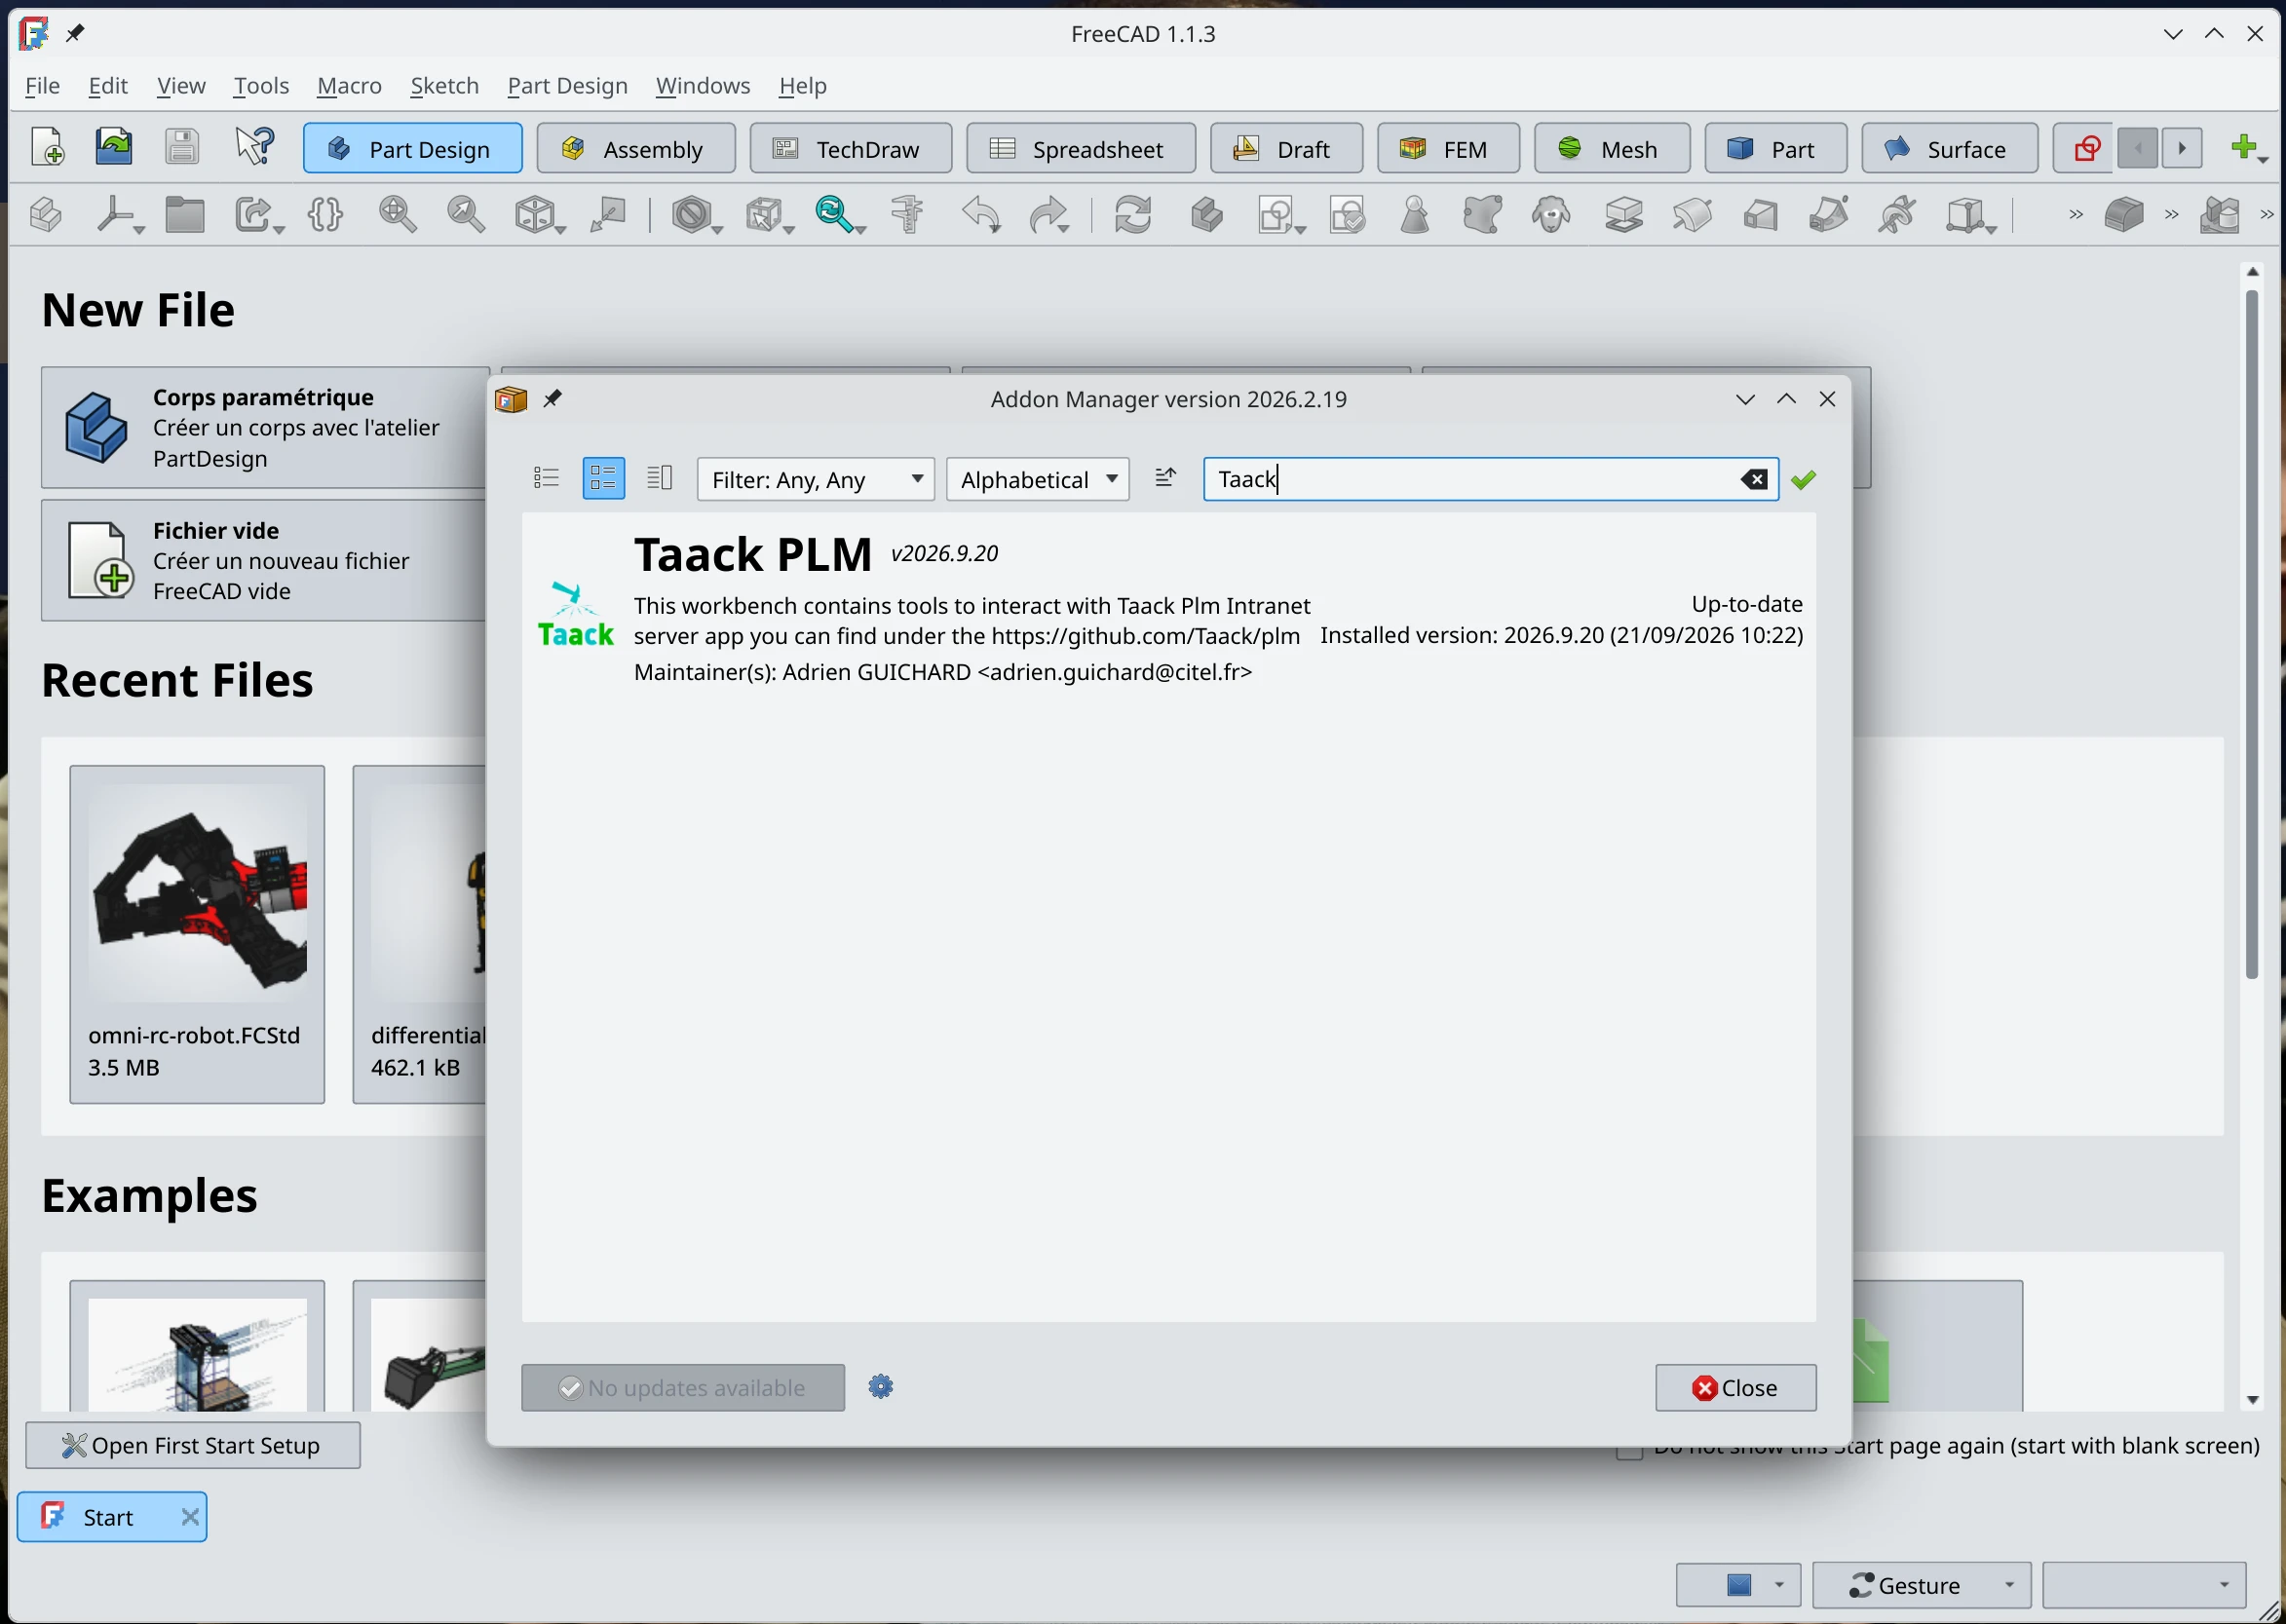
addon screenshot2

Click on installation button.

Usage

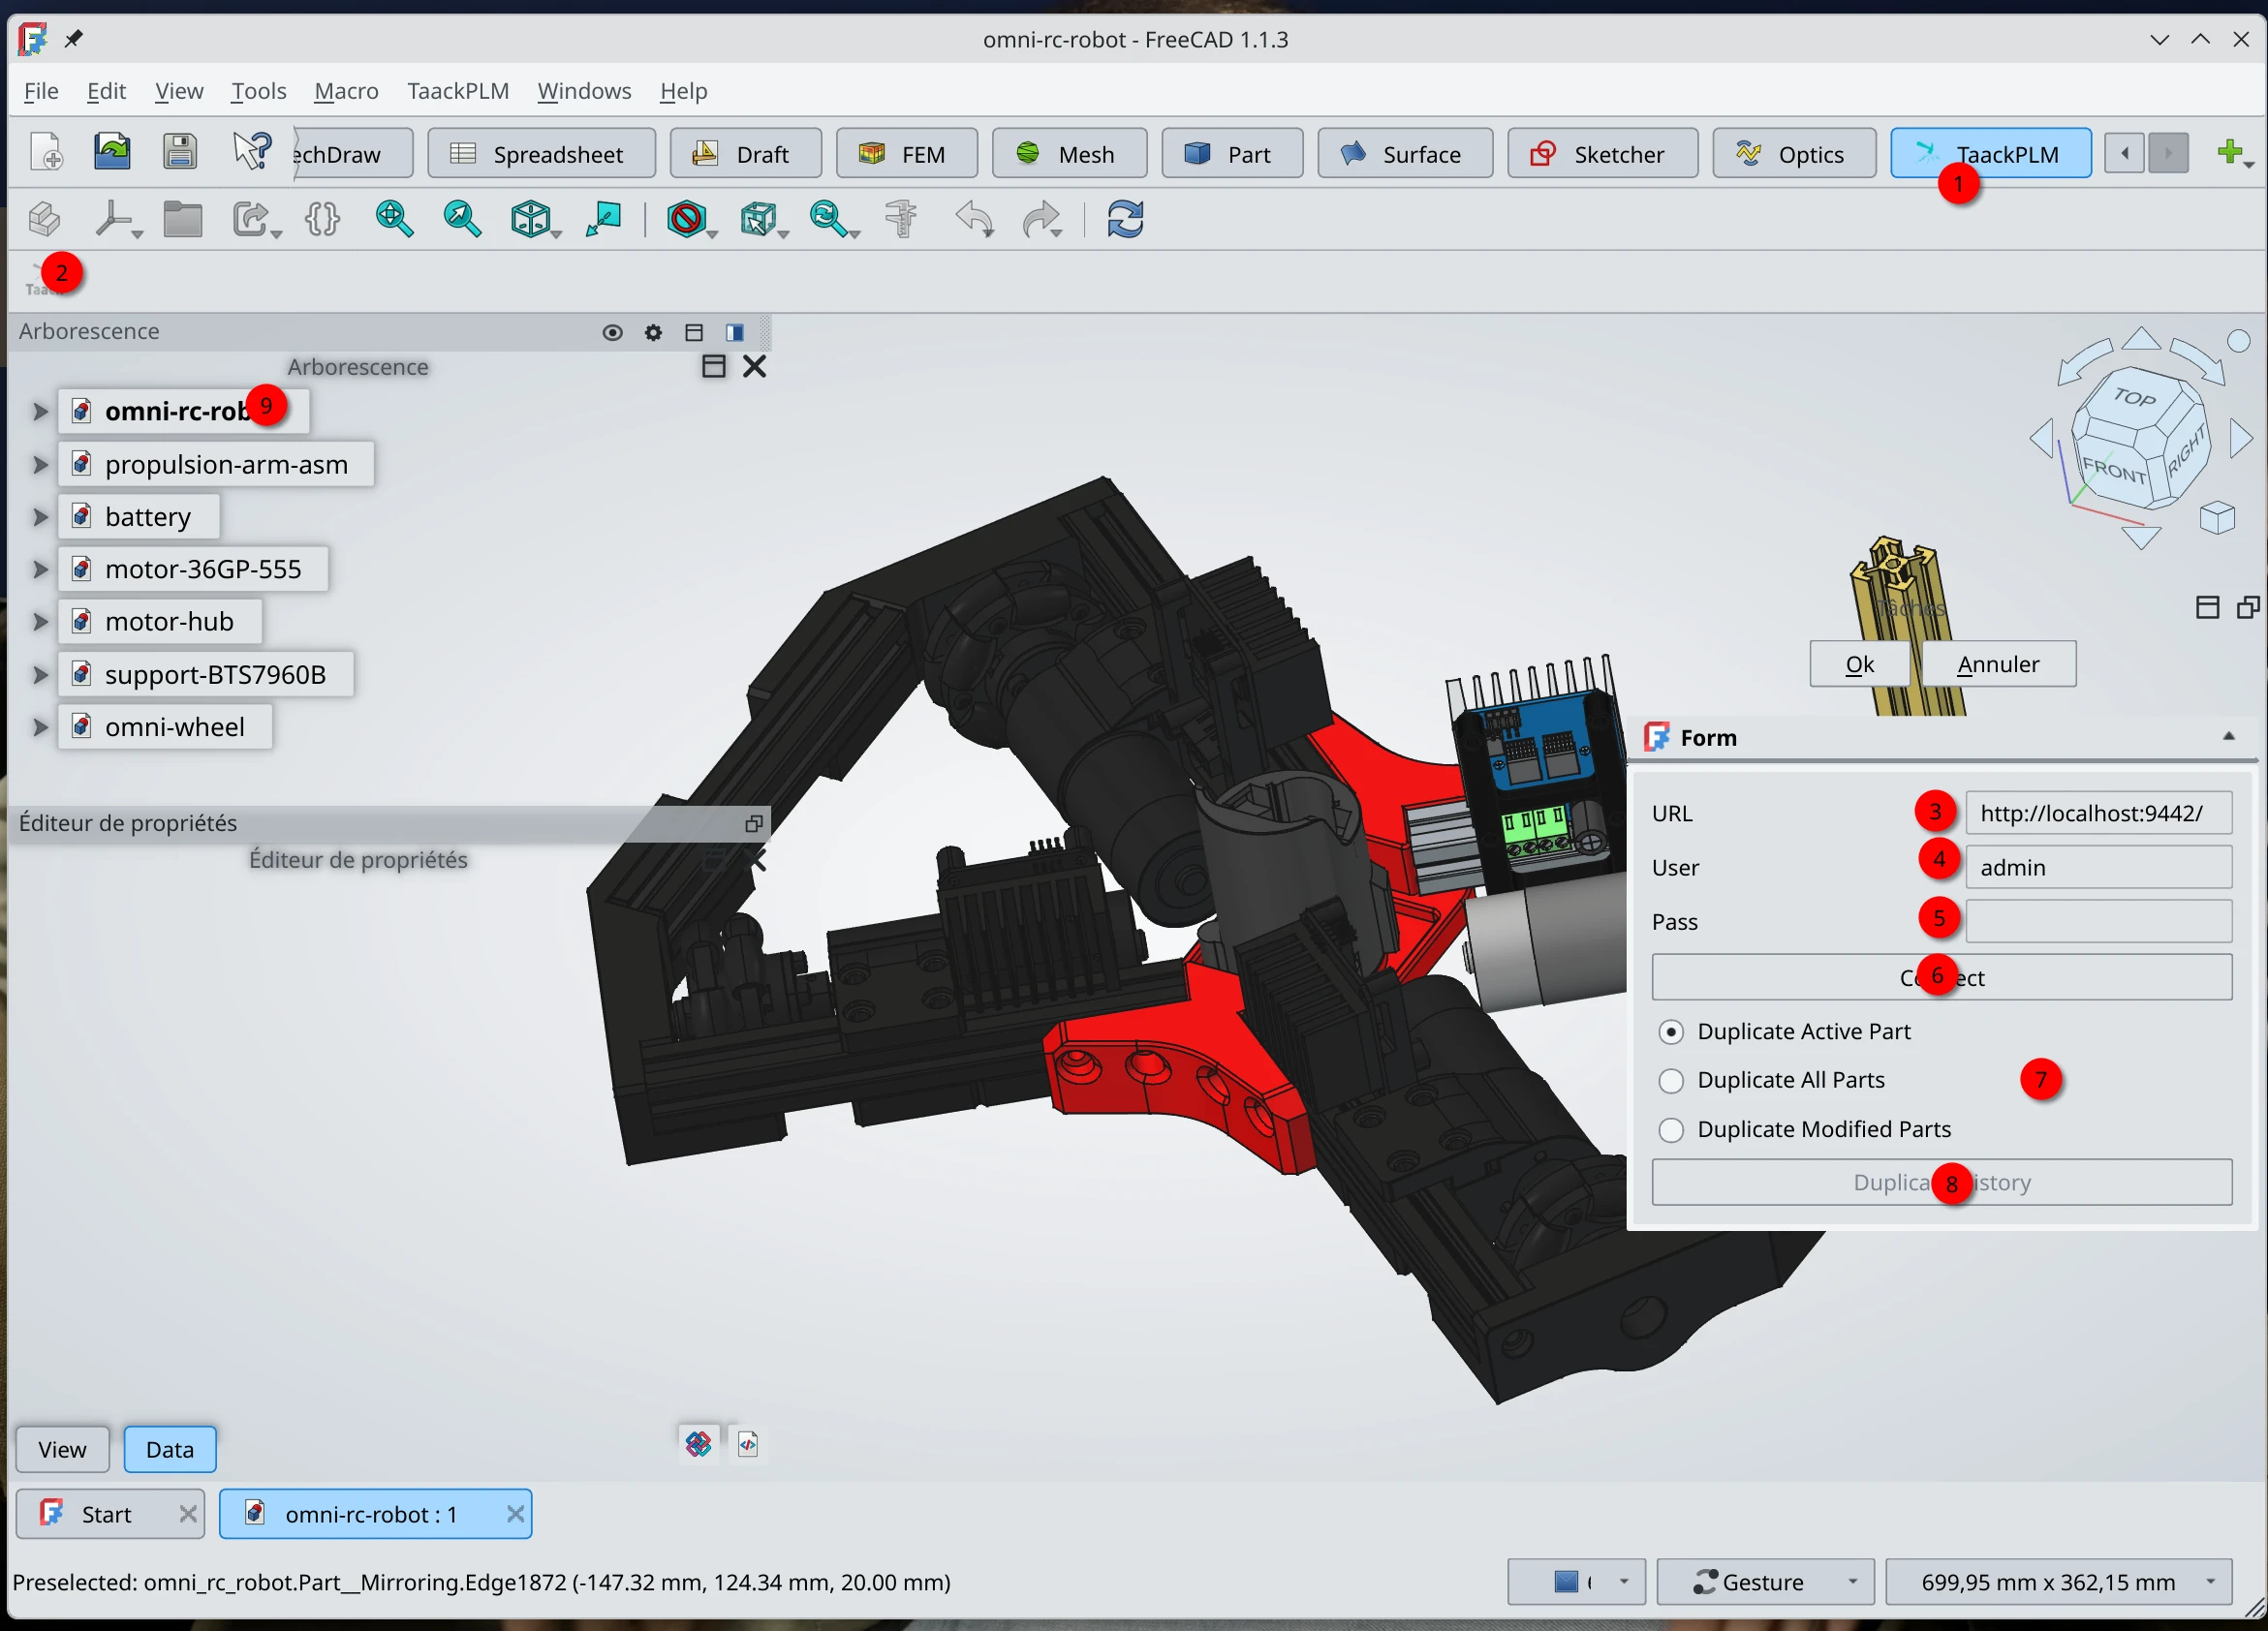
plm12 screenshot
Figure 1. Select Taack PLM Workbench
1 Taack PLM Workbench
2 Main Action
3 Enter server URL (with a trailing '/')
4 Enter User Credentials
5 Enter Password Credentials
6 Connect to the server
7 Choose Duplicate Mode
8 Duplicate History

Clicking on OK button will upload the file into your Intranet. The Intranet will create a preview, this process might take time.
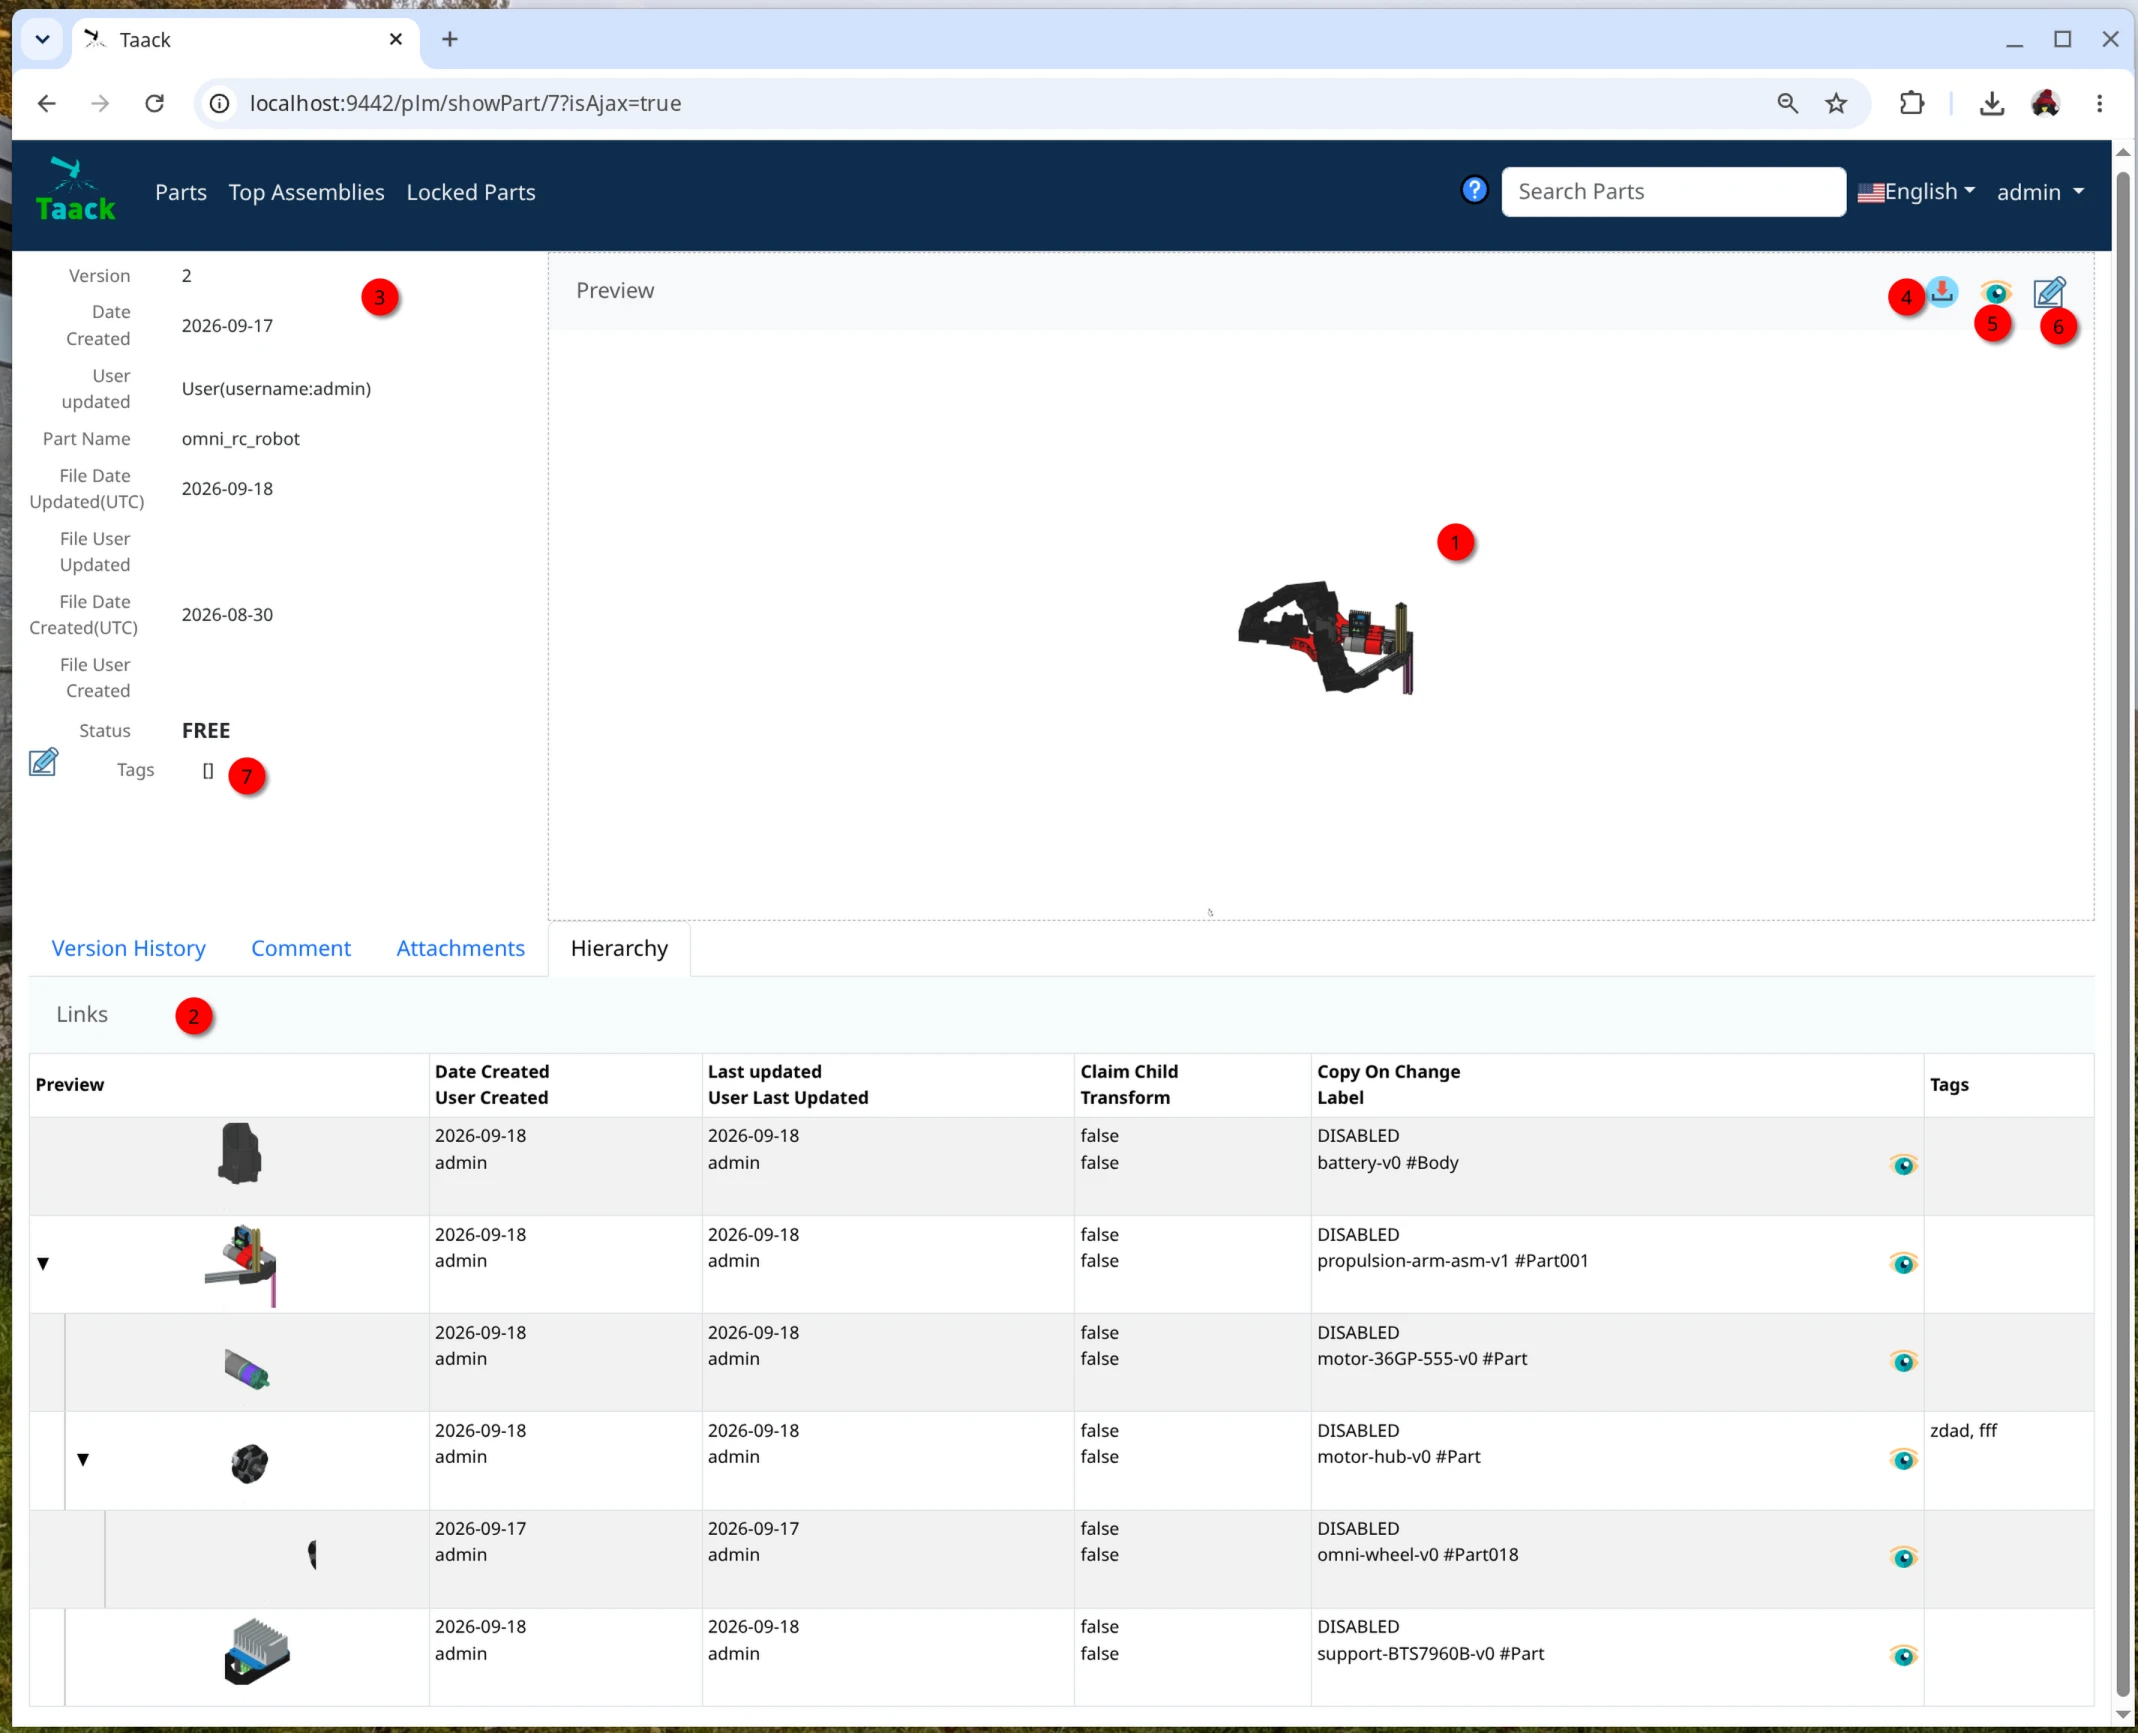
freecad taack plm server part details
Figure 2. Details View of Parts …​
1 File Preview
2 Links Hierarchy
3 Tags
If you have many links, import them from the same computer. From other computers, download the zip file from your intranet.

That’s it; I will record some videos demonstrating this app capabilities.