$ brew install openjdk@25
$ brew install gitTable of Contents
- Installation Guide
- First app
- How does the app work with the Taack Framework?
- Creating a new app plugin
- Managing Future Updates
- Building an app-wide menu
- Creating classes
- Creating a table
- Adding buttons to a table block
- Creating a form and saving objects
- Showing an object
- Deleting an object
- Name headers
- Filtering
- Adding second menu
- Link Authors to Books
- Troubleshooting and Common Errors
Installation Guide
Requirements
To get started, make sure the following tools are installed on your machine:
-
Java (JDK 25 …)
-
Git
Install prerequisites
macOS (Homebrew)
Install JDK 24 and Git using Homebrew
Windows (Winget)
Install JDK 25 and Git using Winget
winget install --id Microsoft.OpenJDK.25
winget install --id Git.Git
Cloning the ready-to-dev Intranet
Clone the starter repository:
$ git clone https://github.com/Taack/intranet.gitThis repository includes a minimal intranet skeleton (Crew user management + Spring Security plugin) ready for development.
Start your intranet
Navigate inside the newly cloned intranet folder and launch the server:
$ cd intranet
$ ./gradlew server:bootRun|
The |
Once the build completes, you should see:
Grails application running at http://localhost:9442TODO: Access the intranet by going to that address in your browser. Use the default login credentials:
-
Username:
admin -
Password:
ChangeIt

Figure 1. Credentials
To change the default admin password, edit the following files:
-
server/grails-app/conf/application.yml -
server/grails-app/conf/application-MACOSX.yml
Look for the line:
taack.admin.password: ChangeItAfter making the change, delete the file intranetDb.mv.db to apply the new password.
|
|
|
Deleting the |
Configure a persistent database
If you want data to be persistent, change the server/grails-app/conf/application.yml and
server/grails-app/conf/application-MACOSX.yml file to use a persistent database.
Here we want H2 to persist data in a file in development mode:
environments:
    development:
        dataSource:
            dbCreate: update        (1)
url: jdbc:h2:./intranetDb;LOCK_TIMEOUT=10000;DB_CLOSE_ON_EXIT=FALSE (2)| 1 | Creation mode (see Grails GORM docs) |
| 2 | intranetDb: root of the filename containing data |
Producing a Jar file for Tomcat
Use the assemble task instead of bootRun:
$ ./gradlew server:assembleThe assembled JAR (e.g., server-0.6.jar) will be located in server/build/libs.
You can deploy it to your production server or test it locally
cd server/build/libs
java -jar server-[version].jar (1)| 1 | The version number is located in build.gradle. The default value is 0.6 |
|
Make sure you are not already running the application when starting a new instance. |
Set up your IDE
We highly recommend using the latest version of IntelliJ Ultimate Edition for its comprehensive support of Groovy and Grails.
IntelliJ Ultimate Edition
We recommend installing the IntelliJ Taack Plugin which you can install from the IntelliJ Marketplace TaackUiASTAutocomplete or directly from the source code repository.
Open the project, go to File > Open… and select intranet/settings.gradle.
Make sure that Gradle is using JDK 25:
Open Gradle Settings and Check Gradle JDK Version
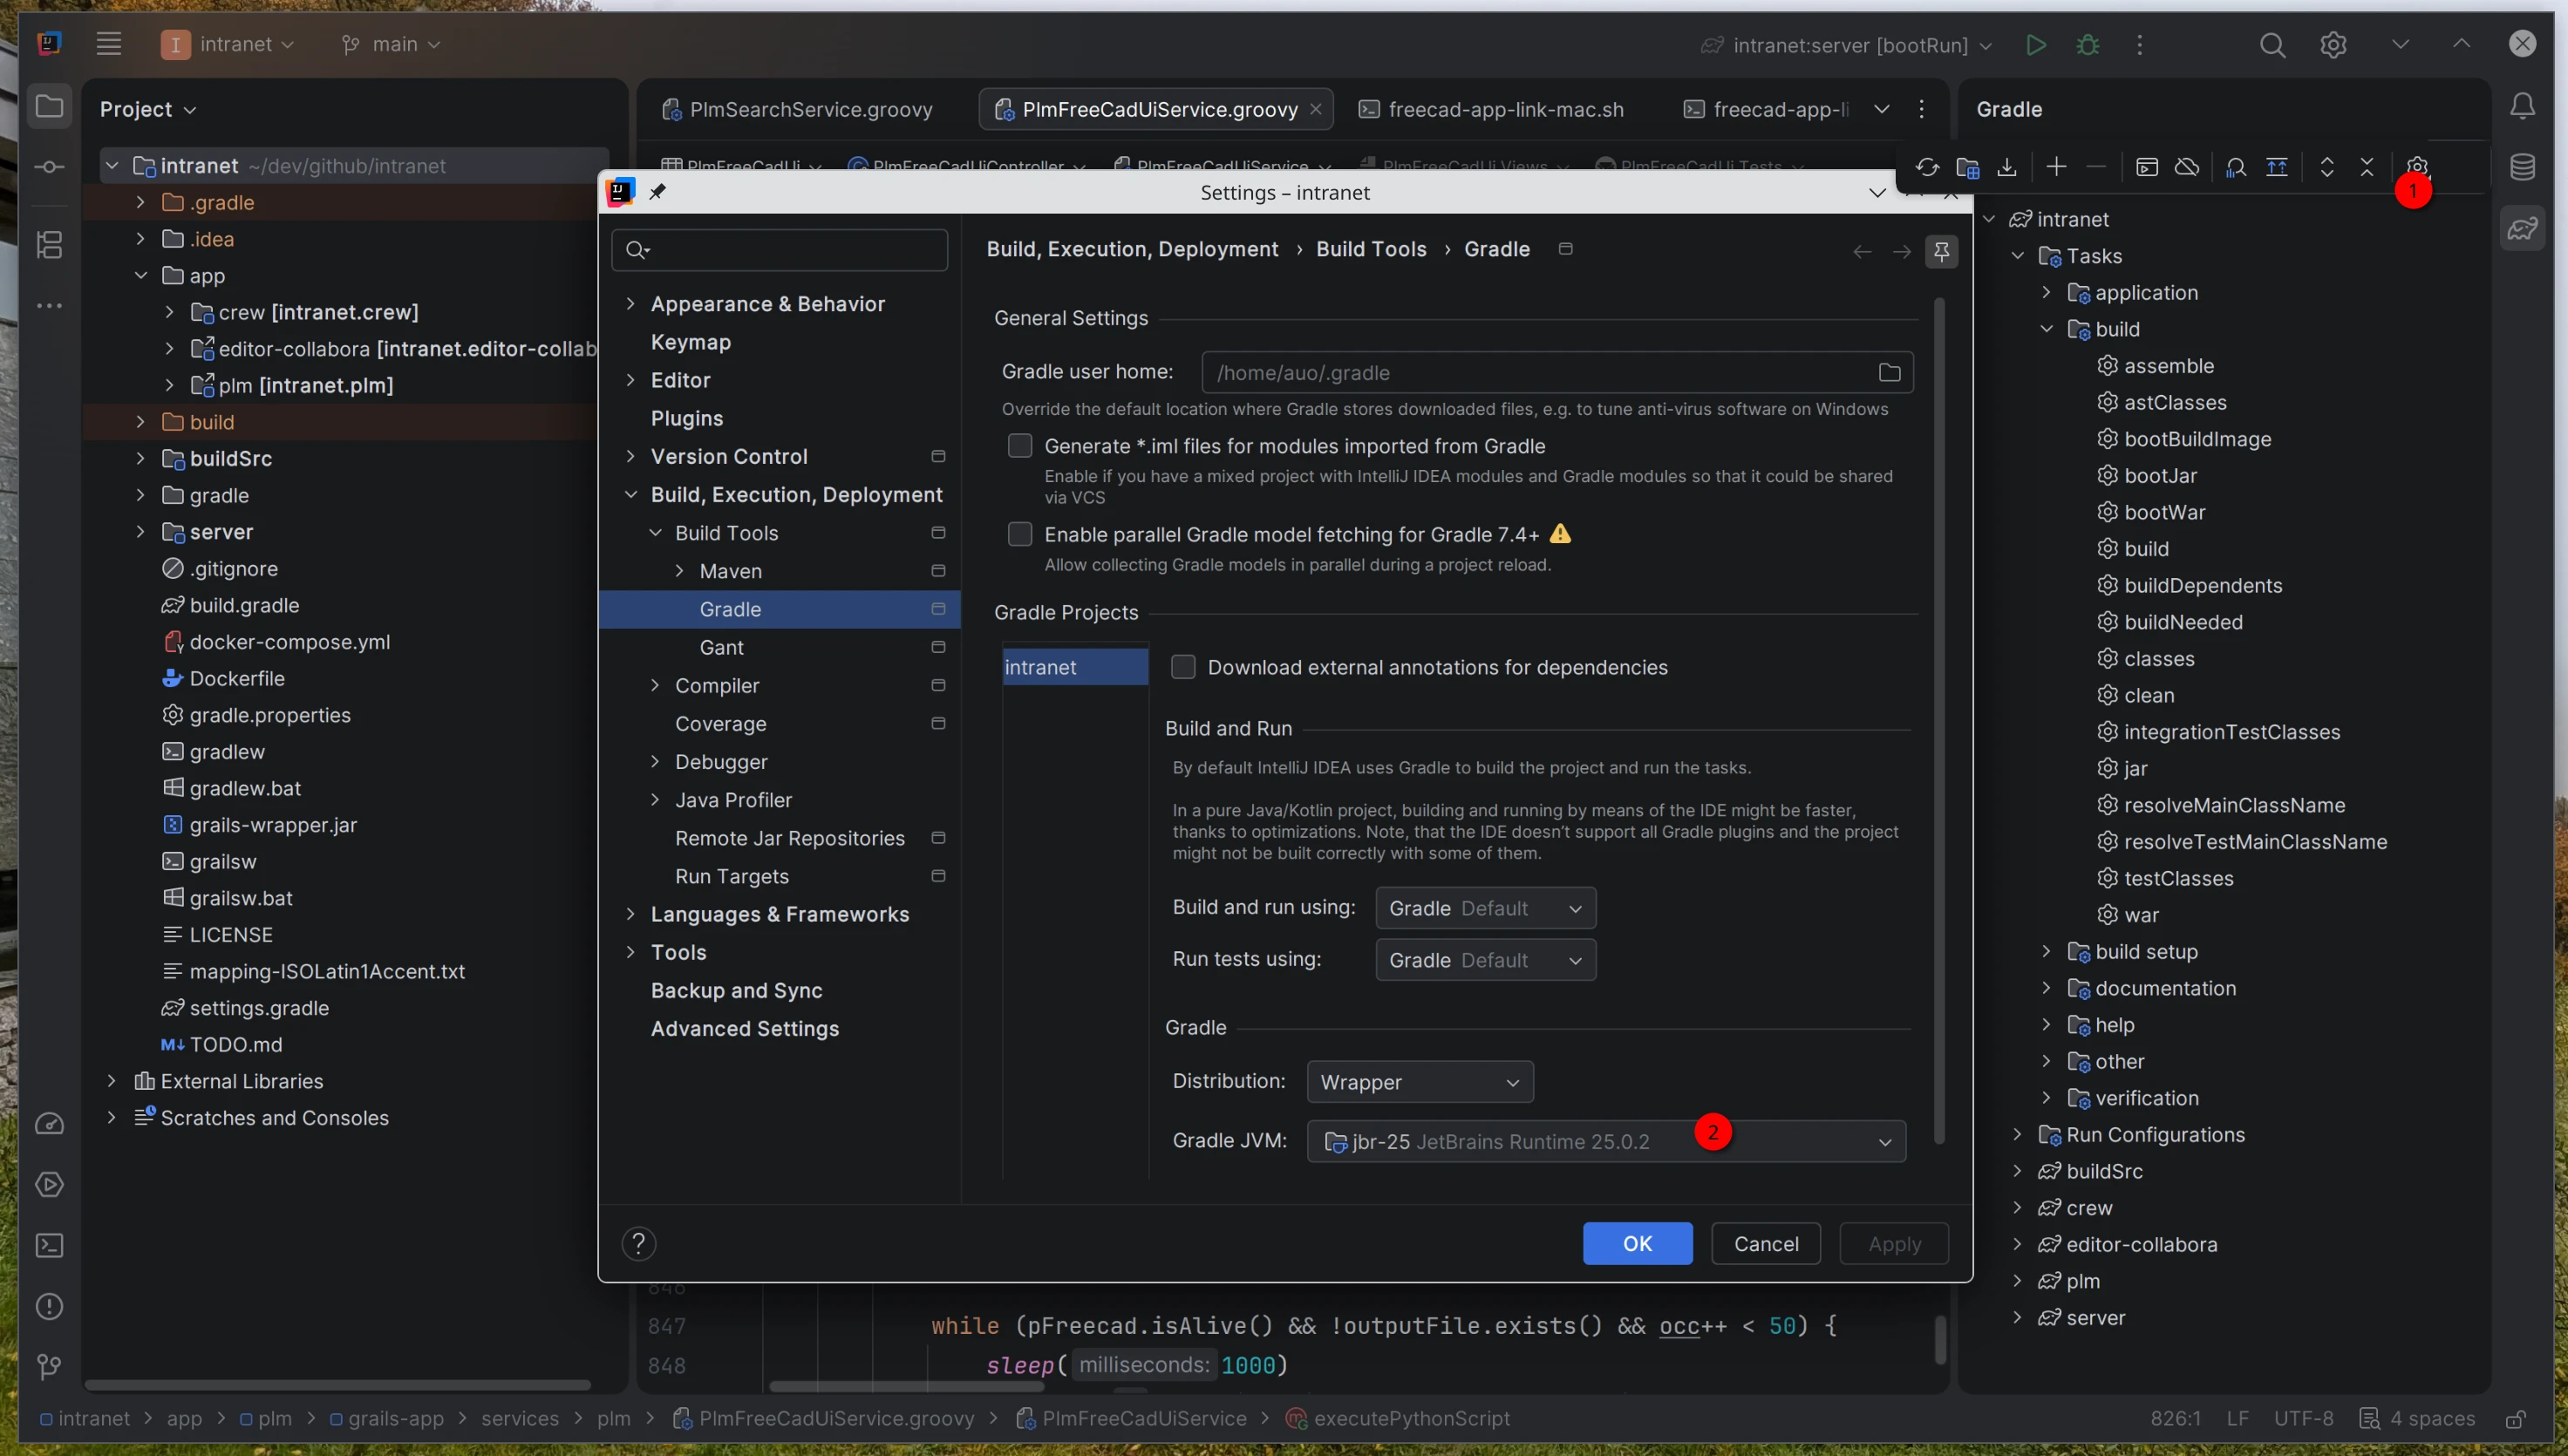
| 1 | Open Gradle Settings |
| 2 | Check Gradle JVM version is 25 (The provider can be anything) |
Visual Studio Code
If you prefer Visual Studio Code, we recommend the following extensions to use this framework:
|
Most of the Grails and Taack Framework features will not be recognized by VS Code. Imports, navigation, and code assistance may be limited. IntelliJ remains the preferred IDE for full support. |
First app
How does the app work with the Taack Framework?
Your intranet project has two parts:
-
The app plugins, located in the
appfolder, are micro-projects, each with its own dependencies, build, etc. (e.g., Crew). For a more in-depth explanation of how plugins are declared, see About Plugins. -
The main server uses all the app plugins that are implemented in its
build.gradleand displays them on the main intranet page.
Creating a new app plugin
To create a new app plugin (a Gradle module), make sure you pull the latest version of your intranet from our GitHub repository (see installation).
Execute the following command from your intranet root folder:
$ ./gradlew -DmodName=myBooks server:generateTaackAppTaskThis creates a new folder app/myBooks.
|
Under |
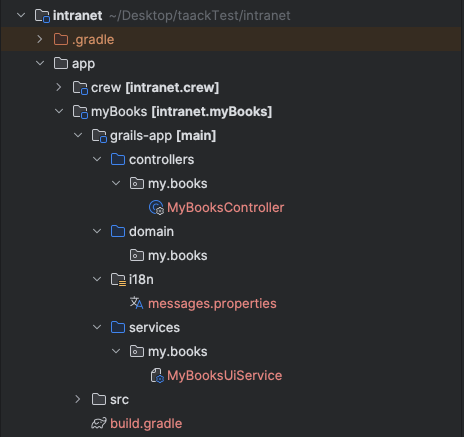
Figure 2. myBooks Content
To make your IDE recognize the newly created module, reload Gradle by clicking the icon shown below:

Figure 3. Gradle Reload
Managing Future Updates
Most of the time, updating your intranet should involve updating buildSrc folder, gradle.properties, and, less often, the app’s build.gradle files.
|
In fact, this process is common in long-term software development, and should not intimidate newcomers. |
Building an app-wide menu
TODO: We’re going to build two menus, one for books and one for authors. In each menu you’ll be able to add new items, filter them, and see every entry in a table.
Let’s focus on the navigation for your new app, myBooks.
The initial step is to define how the menu will be constructed. Go to grails-app/services/my/books/MyBooksUiService.
You should see the following code (which may vary slightly according to the version):
static UiMenuSpecifier buildMenu(String q = null) { (1)
    new UiMenuSpecifier().ui {
        menu MyBooksController.&index as MC
    }
}| 1 | Add static if not already present. |
We create a UiMenuSpecifier object to define the menu structure, then specify the content to display.
menu MyBooksController.&index as MCIn this case, menu creates a simple link in the navigation bar. index is the name shown for the link, and MyBooksController.&index (using MethodClosure) defines the action to which the link will redirect.
Creating classes
Create a Groovy Class called Author in grails-app/domain/my/books.

Figure 4. Create a class
Add the following code:
import grails.compiler.GrailsCompileStatic
import taack.ast.annotation.TaackFieldEnum

@GrailsCompileStatic
@TaackFieldEnum
class Author {
    String firstName
    String lastName
    Date dateOfBirth
}
Create another Groovy Class called Book in grails-app/domain/my/books.
Add the following code:
import grails.compiler.GrailsCompileStatic
import taack.ast.annotation.TaackFieldEnum

@GrailsCompileStatic
@TaackFieldEnum
class Book {
    String title
    String authorName
    int numberOfPages
}|
Always use |
Creating a table
Now let’s display a table in our listBook page. Go to grails-app/services/my/books/MyBooksUiService.
Create a new table Specifier called buildBookTable:
UiTableSpecifier buildBookTable() {
    Book book = new Book()
    UiTableSpecifier bookTableSpecifier = new UiTableSpecifier()
    bookTableSpecifier.ui {
    //Add table content inside the closure here
    }
}
Here we are defining a new table that will list Book instances. Use import taack.ui.dsl.UiTableSpecifier.
To define the table headers add the following code in the closure (import necessary classes):
bookTableSpecifier.ui {
    // -- Header --
    header {
        column {
            sortableFieldHeader book.title_ (1)
        }
        column {
            label book.authorName_
        }
        column {
            label book.numberOfPages_
        }
        column {
            label "Delete book"
        }
    }
}| 1 | Note here we use sortableFieldHeader, this makes the column sortable, you can sort the books in alphabetical order by clicking on the book.title header.
Now we are going to populate our table, we’ll iterate over Book instances in the database by using the iterate table DSL method. |
Add the following code (initialize and import necessary classes):
bookTableSpecifier.ui {
    //table headers...

    iterate(taackFilterService.getBuilder(Book) (1)
        .setMaxNumberOfLine(8) (2)
        .setSortOrder(TaackFilter.Order.DESC, book.title_) (3)
        .build()) { Book bookIterator ->
    rowColumn {
        rowField bookIterator.title_ (4)
    }
    rowColumn {
        rowField bookIterator.authorName_
    }
    rowColumn {
        rowField bookIterator.numberOfPages_
    }
    rowColumn {
        rowAction ActionIcon.DELETE * IconStyle.SCALE_DOWN, (5)
            MyBooksController.&deleteBook as MethodClosure, bookIterator.id
        }
    }
}| 1 | Use import taack.domain.TaackFilterService. |
| 2 | Only the first eight books will be displayed. |
| 3 | Sets the order of display according to the title of the books in descending order (use import taack.domain.TaackFilter). |
| 4 | The underscore is needed here. |
| 5 | Use import taack.ui.dsl.common.ActionIcon
import taack.ui.dsl.common.IconStyle. |
|
We need to create the action |
Go to grails-app/controllers/my/books/MyBooksController.groovy.
Add the following method after the
index action:def deleteBook () {}For each book in our list, we make a new row with the title of the book in the first column, followed by the author, the number of pages, and a Delete button in the fourth column.
Your table is now complete; we just need to render it on the page.
To render previously built UiSpecifiers, we need to use taackUiService it should already be imported in the controller created by the create-taack-app command.
We will do this in a module called listBook inside the index method, replace its content with a redirect to the listBook action.
Redirect to the listBook action:
def index() {
    redirect action: 'listBook'
}
Create an action called
listBook and add the following code:UiTableSpecifier tableBookSpecifier = myBooksUiService.buildBookTable() (1)
taackUiService.show(new UiBlockSpecifier().ui {
table tableBookSpecifier
}, MyBooksUiService.buildMenu())| 1 | Obtains the tableSpecifier we created from MyBooksUiServices. |
Use import taack.ui.dsl.UiTableSpecifier.
taackUiService.show(UiBlockSpecifier block, UiMenuSpecifier menu) will be in charge of rendering the specification we give him.
We use the previously created static buildMenu() method from MyBooksUiService as the second argument of show() to render the menu alongside the page.
You can now start the server and navigate to your new app (myBooks.app).
The table should be functional, but currently you will only see the table headers since there are no books in your database.
So let’s proceed with creating a form and saving objects into the database.

Figure 5. Empty Books Table
Adding buttons to a table block
Let’s add a button to the Book table that opens a modal via AJAX to create a new Book. To achieve this, we need to add a closure in the table.
Add the following code:
taackUiService.show(new UiBlockSpecifier().ui {
    table tableBookSpecifier, {
        //Added Closure here
        menuIcon ActionIcon.CREATE, this.&bookForm as MethodClosure (1)
    }
}, MyBooksUiService.buildMenu())| 1 | You will have to define the bookForm action, just as we did with deleteBook. |
Don’t forget to use import taack.ui.dsl.common.ActionIcon
Now start the server and navigate to your new app again, you will see a Create button on the top-right of the table.

Figure 6. Button
The menuIcon method is composed of the following parameters:
-
The icon used by the button must be an ActionIcon enum value.
-
The action that the button will redirect to.
Creating a form and saving objects
We are now going to make the form that will be used to create and update books.
To manage both cases we are going to initialize a new Book or read if a Book ID has been passed in the request parameters in MyBooksUiService.
Create a new Form Specifier called buildBookForm:
UiFormSpecifier buildBookForm(Book book) {
    book ?= new Book(params) (1)
}| 1 | This means if book is null, assign it a new instance using request parameters. |
Now we define its form and content.
Add the following in buildBookForm (import the necessary classes):
UiFormSpecifier bookFormSpecifier = new UiFormSpecifier()
bookFormSpecifier.ui book, {
    //Section of fields
    section "Book details", {
        field book.title_
        field book.authorName_
        field book.numberOfPages_
    }
    //Save button
    formAction MyBooksController.&saveBook as MethodClosure (1)
}| 1 | You will have to define the saveBook action (same as deleteBook) in MyBooksController |
Use import taack.ui.dsl.UiFormSpecifier.
Once your form is defined, you can display it using the taackUiService.show() method.
Add the following inside the
bookForm method in MyBooksController:def bookForm(Book book) {
UiFormSpecifier tableFormSpecifier = myBooksUiService.buildBookForm book
taackUiService.show new UiBlockSpecifier().ui {
modal {
form tableFormSpecifier
}
}
}Use import taack.ui.dsl.UiFormSpecifier.
This time we don’t specify buildMenu in our show since we don’t want the menu to be rendered inside the modal.
Modify the
saveBook action (import and initialize the necessary classes):@Transactional
def saveBook() {
taackSaveService.saveThenReloadOrRenderErrors(Book)
}Use import taack.render.TaackSaveService and import grails.gorm.transactions.Transactional.
|
See Close Modal and reload page for how to avoid the use of |
Start the server again, you should now be able to click on the button and fill out the form.
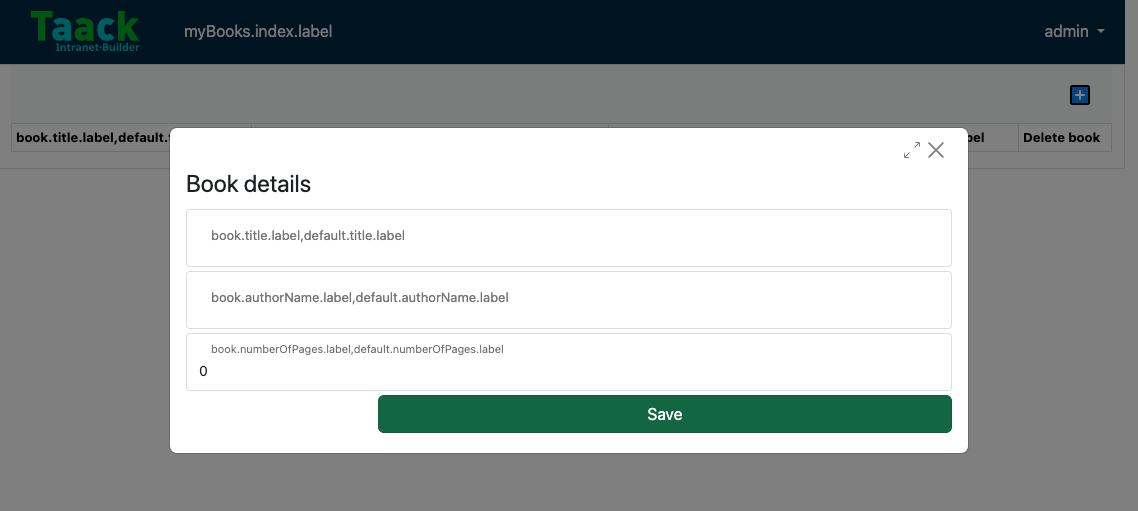
Figure 7. Form
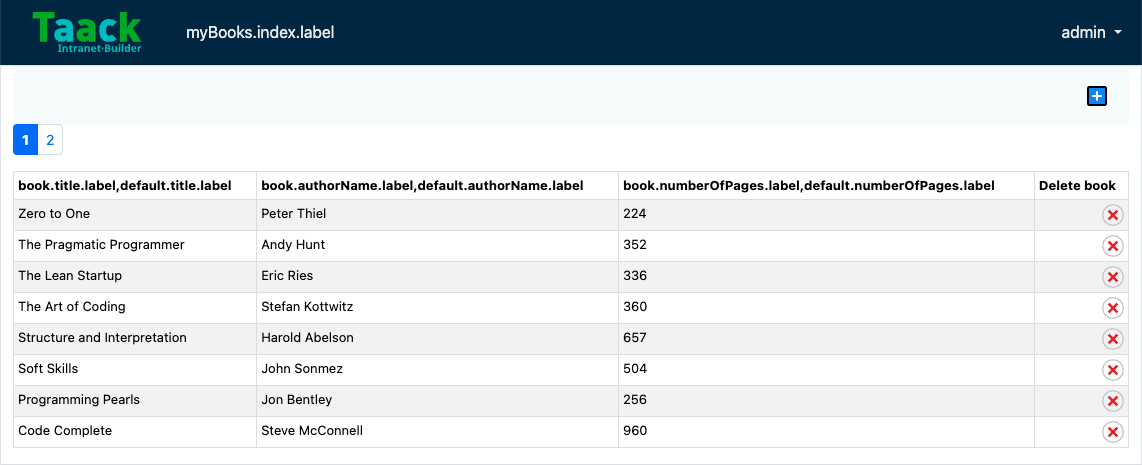
Figure 8. Books saved
|
In the top-left corner, you can switch between sets of books using the page numbers (1 or 2). This navigation appears because the list is limited to 8 books per set. |
Showing an object
Now that we can create books and see a list of them in a table, let’s display each book in more detail using a modal.
Once again we define the specifier, and we will render it inside a modal block using taackUiService.show().
Create showBook (import the necessary class):
def showBook(Book book) {
    // Define the show displayed fields
    UiShowSpecifier showSpec = new UiShowSpecifier().ui({
        fieldLabeled book.title_
        fieldLabeled book.authorName_
    })

    taackUiService.show(new UiBlockSpecifier().ui {
        modal {
            show showSpec
        }
    })
}
Use import taack.ui.dsl.UiShowSpecifier.
We also need to display a link to this modal in the table. To do that, add the following line in the same rowColumn (Below the book title field) that you want the button to appear in MyBooksUiService:
Add 2 lines in
buildBookTable:UiTableSpecifier buildBookTable() {
//Section of code
rowColumn {
//Add these 2 lines
rowAction ActionIcon.SHOW * IconStyle.SCALE_DOWN, (1)
MyBooksController.&showBook as MethodClosure, bookIterator.id
rowField bookIterator.title_
}
//Section of code
}| 1 | Here, we reduce the size of the icon with the multiply operator. |
This will create a small icon button in the table cell that will open a modal with the corresponding book information.
Note that ActionIcon was multiplied by an IconStyle to change its size in this case.
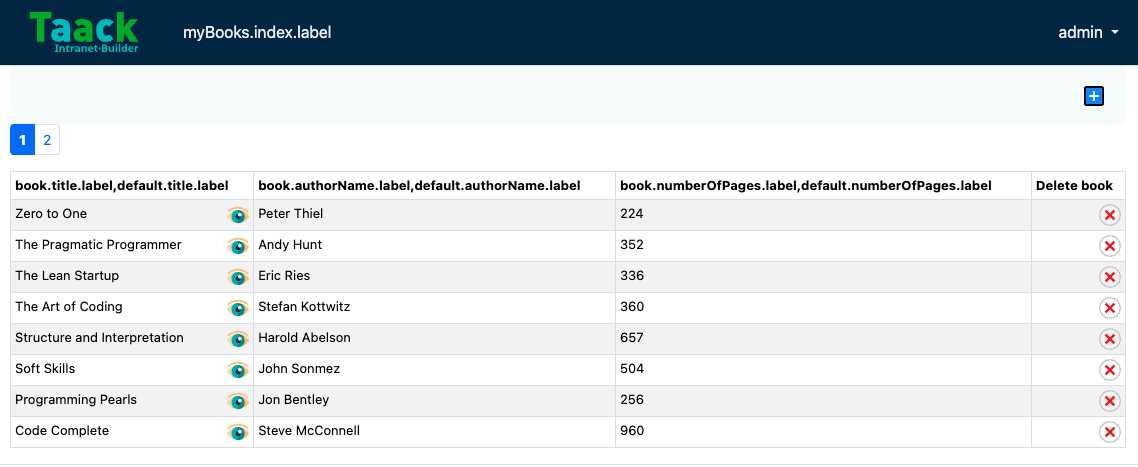
Figure 9. Showing object
Click on the eye icon to display the book.
Deleting an object
Remember the Delete button we added to our table?
Let’s make the Delete button functional by defining the deleteBook action it calls.
@Transactional
def deleteBook(Book book) {
    book.delete()
    redirect action: 'index'
}|
In some cases, it is better to add a field |
We use Grails delete method to delete the book from the database and then redirect to the index action where the book table is.
Delete book
Note that the field names are not direct labels, but i18n keys like book.numberOfPages.label,default.numberOfPages.label (referring to the i18n keys in messages.properties). Let’s change that!
Name headers
To set the name of the headers, go to app/myBooks/grails-app/i18n/messages.properties.
Set
default.numberOfPages.label and the other labels to names of your choice:default.authorName.label=Author Name
default.title.label=Title
default.numberOfPages.label=Number of Pages
myBooks.index.label=Books
myBooks.app=Book
myBooks.desc=Book storageRun the server to view the updated label names.
Filtering
If we add too many books we may waste time finding a specific book, filtering the books could make book search more efficient. Let’s implement this in MyBooksUiServices.
Create a new filter Specifier called buildBookFilter:
UiFilterSpecifier buildBookFilter(Book book) {
    UiFilterSpecifier bookFilterSpecifier = new UiFilterSpecifier() (1)

    bookFilterSpecifier.ui Book, { (2)
        section "Book Filter", {  (3)
            filterField book.title_ (4)
        }
    }
}| 1 | Create the filter. Use import taack.ui.dsl.UiFilterSpecifier. |
| 2 | Pass the object class and the closure containing the specifications of the filter via the ui method. |
| 3 | Create a section labeled "Book Filter". |
| 4 | Add field to the filter, note the underscore at the end of the field name. |
The next step is to display this recently created filter.
Modify
taackUiService.show in listBook (located in MyBooksController):def listBook() {
Book book = new Book()
UiTableSpecifier tableBookSpecifier = myBooksUiService.buildBookTable()
UiFilterSpecifier filterBookSpecifier = myBooksUiService.buildBookFilter book
taackUiService.show(new UiBlockSpecifier().ui {
tableFilter filterBookSpecifier, tableBookSpecifier, {
menuIcon ActionIcon.CREATE, this.&bookForm as MethodClosure
}
}, MyBooksUiService.buildMenu())
}Use import taack.ui.dsl.UiFilterSpecifier.
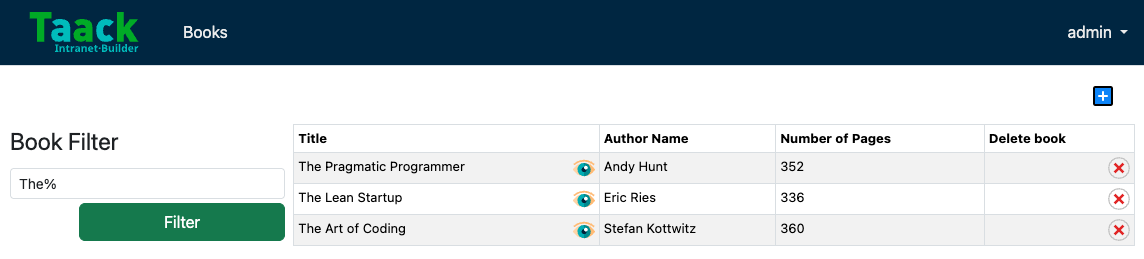
Figure 10. Filtering
For more detailed information about filtering refer to the Filter Table Doc.
Adding second menu
Remember the Author class we created at the beginning? It’s time to use it! We are going to create a second menu where we will be able to add authors and filter them.
Add this line of code in
buildMenu in MyBooksUiService:menu MyBooksController.&listAuthor as MCThis creates a second menu in the top-left corner for accessing the author page.
|
You can also create nested submenus inside the main menu. This creates a submenu labeled " Menu" containing a link to the |
Add the following builders in
MyBooksUiServices:UiTableSpecifier buildAuthorTable(Boolean isSelect = false ) {
Author author = new Author()
UiTableSpecifier authorTableSpecifier = new UiTableSpecifier()
authorTableSpecifier.ui {
header {
column {
sortableFieldHeader author.firstName_
}
column {
sortableFieldHeader author.lastName_
}
column {
label author.dateOfBirth_
}
column {
label "Delete Author"
}
}
iterate(taackFilterService.getBuilder(Author)
.setMaxNumberOfLine(8)
.setSortOrder(TaackFilter.Order.DESC, author.lastName_)
.build()) { Author authorIterator ->
rowColumn {
rowField authorIterator.firstName_
rowAction ActionIcon.SHOW * IconStyle.SCALE_DOWN,
MyBooksController.&showAuthor as MethodClosure, authorIterator.id
}
rowColumn {
rowField authorIterator.lastName_
}
rowColumn {
rowField authorIterator.dateOfBirth_
}
rowColumn {
rowAction ActionIcon.DELETE * IconStyle.SCALE_DOWN,
MyBooksController.&deleteAuthor as MC, authorIterator.id
}
}
}
}
UiFormSpecifier buildAuthorForm(Author author) {
author ?= new Author(params)
UiFormSpecifier authorFormSpecifier = new UiFormSpecifier()
authorFormSpecifier.ui author, {
section "Author details", {
field author.firstName_
field author.lastName_
field author.dateOfBirth_
}
formAction MyBooksController.&saveAuthor as MC
}
}
UiFilterSpecifier buildAuthorFilter() {
Author author = new Author()
UiFilterSpecifier authorFilterSpecifier = new UiFilterSpecifier()
authorFilterSpecifier.ui Author, {
section "Author Filter", {
filterField author.lastName_
}
}
}Note the isSelect in the buildAuthorTable will be used later.
Create the
listAuthor method in MyBooksController:def listAuthor() {
UiTableSpecifier tableAuthorSpecifier = myBooksUiService.buildAuthorTable()
UiFilterSpecifier filterAuthorSpecifier = myBooksUiService.buildAuthorFilter()
taackUiService.show(new UiBlockSpecifier().ui {
tableFilter filterAuthorSpecifier, tableAuthorSpecifier, {
menuIcon ActionIcon.CREATE, this.&authorForm as MethodClosure
}
}, MyBooksUiService.buildMenu())
}Add the necessary methods
deleteAuthor, saveAuthor, authorForm, and showAuthor:def authorForm(Author author) {
UiFormSpecifier tableFormSpecifier = myBooksUiService.buildAuthorForm author
taackUiService.show new UiBlockSpecifier().ui {
modal {
form tableFormSpecifier
}
}
}
@Transactional
def deleteAuthor(Author author) {
author.delete()
redirect action: 'index'
}
@Transactional
def saveAuthor() {
taackSaveService.saveThenReloadOrRenderErrors(Author)
}
def showAuthor(Author author) {
UiShowSpecifier showSpec = new UiShowSpecifier().ui(author, {
fieldLabeled author.firstName_
fieldLabeled author.lastName_
})
taackUiService.show(new UiBlockSpecifier().ui {
modal {
show showSpec
}
})
}Set the new default labels to the name of your choice:
default.firstName.label=First Name
default.lastName.label=Last Name
default.dateOfBirth.label=Date of Birth
myBooks.listAuthor.label= Authors
You now have separate menus for Books and Authors, but they currently operate independently. What if you could select an author directly from the list of registered authors when creating a book? Let’s implement that feature.
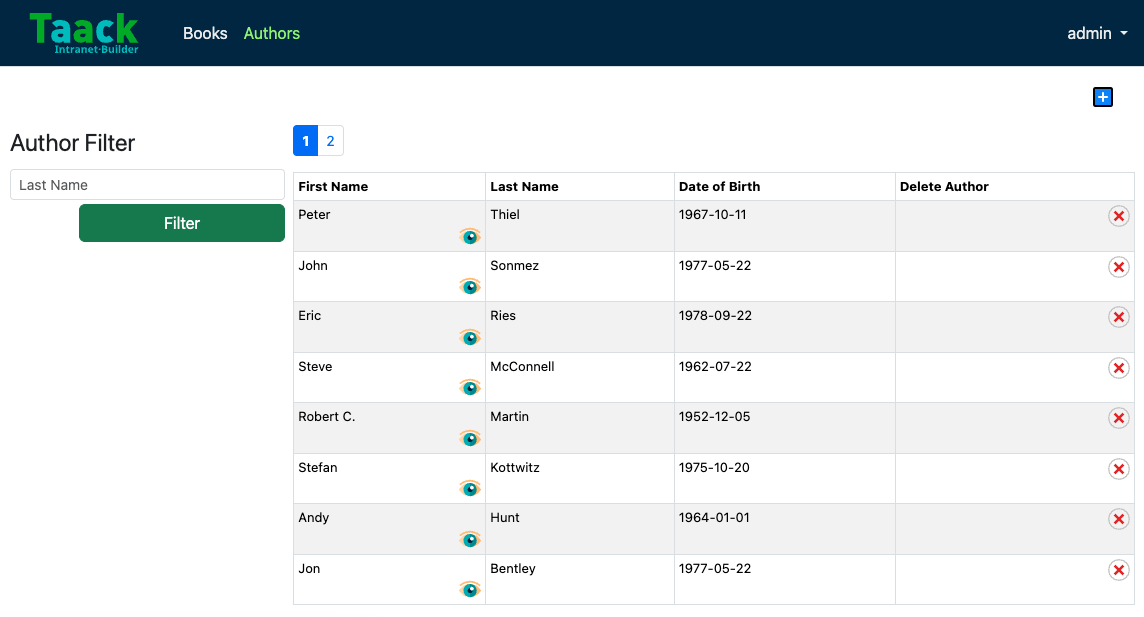
Figure 11. Author Table
Link Authors to Books
Add the following method to the
Author class:String toString() {
return firstName + ' ' + lastName
}Modify the variable in the book class:
Author author|
Change all instances of |
|
Changing the name or field of a class is strongly discouraged, as it will require to erase files containing the previously added data.
You must delete |
Add a line to
messages.properties:default.author.label=Author NameModify the
buildAuthorTable located in MyBooksUiService:rowColumn {
rowField authorIterator.firstName_
rowAction ActionIcon.SHOW * IconStyle.SCALE_DOWN,
MyBooksController.&showAuthor as MethodClosure, authorIterator.id
// Add the following if statement
if (isSelect)
rowAction tr('default.role.label'), ActionIcon.SELECT * IconStyle.SCALE_DOWN, authorIterator.id, authorIterator.toString()
}This will add a select button to select the author when filling out the bookForm. Use import static taack.render.TaackUiService.tr.
Modify the
buildBookForm located in MyBooksUiService, replace field book.author_:ajaxField book.author_, MyBooksController.&selectAuthor as MCThis line will call selectAuthor, when selecting an author in the bookForm.
Let’s implement selectAuthor.
Implement
selectAuthor in MyBooksController:def selectAuthor() {
UiTableSpecifier t = myBooksUiService.buildAuthorTable true (1)
UiFilterSpecifier f = myBooksUiService.buildAuthorFilter()
taackUiService.show new UiBlockSpecifier().ui {
modal {
tableFilter f, t
}
}
}| 1 | Note that isSelect is true.
This will render a compact version of the Author table and its filter when selecting an author for the book form. |
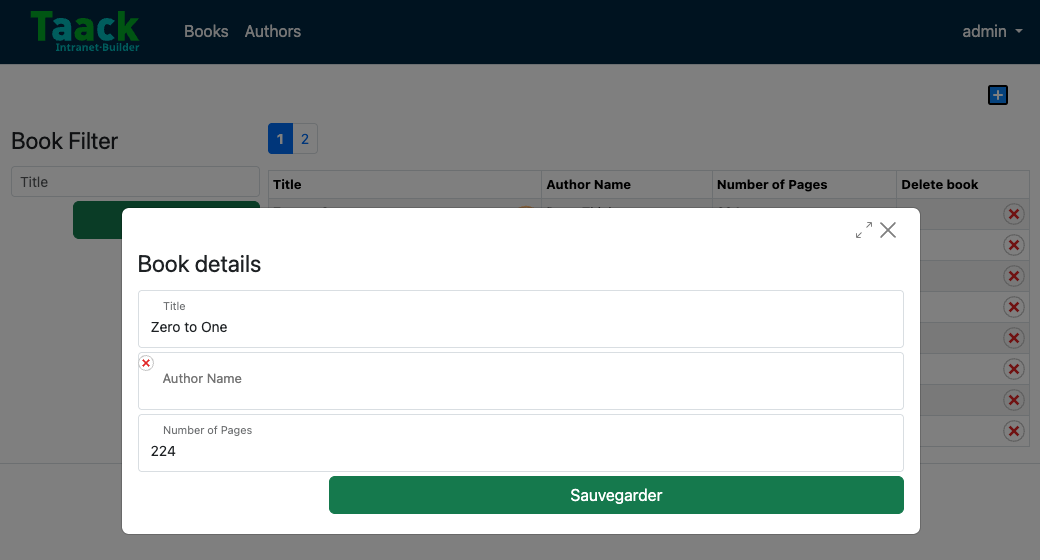
Figure 12. Adding a book with an author from the Author table
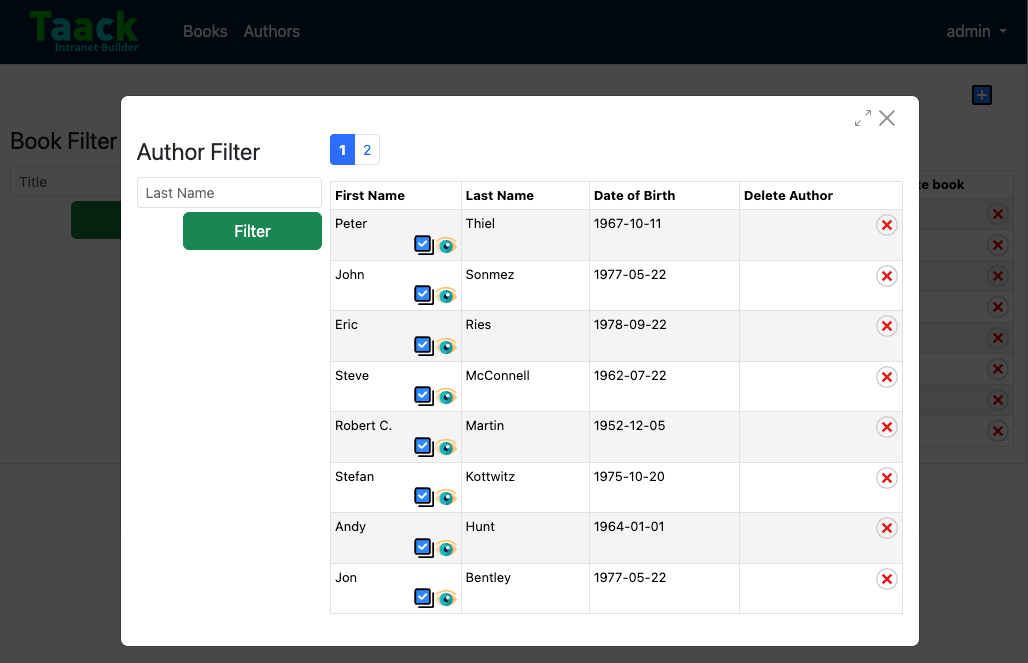
Figure 13. Selecting the author (click on the blue button)
You now have a fully functional CRUD interface for your Book and Author entities using the Taack DSL framework, without needing to write HTML or GSP views manually.
You are now ready to explore the more advanced features of the Taack Ui Framework.
Welcome!
Troubleshooting and Common Errors
Error Output:
ERROR: Cannot resolve symbol 'MyBooksUiService'You forgot to reload Gradle after creating the plugin. Click the Gradle reload button in your IDE.
Error Output:
ERROR: Field 'authorName_' not foundYou renamed the authorName field to author (a reference to Author). Make sure you changed all authorName_ to author_ in both the form and the table.
Error Output:
ERROR: No matching method for action...Make sure you declared the corresponding method in MyBooksController, and used MethodClosure syntax correctly: MyBooksController.&myMethod as MethodClosure.
Form shows but does not save:
You may be missing the @Transactional annotation in the saveBook method or forgot to import taackSaveService.
Database error after renaming fields:
If you changed fields in domain classes, you must delete the database files:
intranet/server/intranetDb.mv.db
intranet/server/intranetDb.trace.db. Be careful, as this will erase all previously saved data.
Database connector not flushing transaction :
You might be using the wrong @Transactional annotation. Be wary that you should use the one from the GORM package and not Javax.
Access h2 database console :
You might want to be able to check data integrity and DDLs generated by the embedded h2 database.
To do so you have to tweak Spring Security settings.
Navigate to Root → /server → /grails-app → /conf
You’ll find an application.groovy file.
Add
[pattern: '/h2-console/**', access: ['permitAll']],To this block of configuration
grails.plugin.springsecurity.controllerAnnotations.staticRules = [
	[pattern: '/',               access: ['permitAll']],
	[pattern: '/error',          access: ['permitAll']],
	[pattern: '/index',          access: ['permitAll']],
	[pattern: '/index.gsp',      access: ['permitAll']],
	[pattern: '/shutdown',       access: ['permitAll']],
	[pattern: '/assets/**',      access: ['permitAll']],
	[pattern: '/**/js/**',       access: ['permitAll']],
	[pattern: '/**/css/**',      access: ['permitAll']],
	[pattern: '/**/images/**',   access: ['permitAll']],
	[pattern: '/**/favicon.ico', access: ['permitAll']]
]